INTERFACING LED WITH ARDUINO
Actually Interfacing LED to a Arduino looks like a very simple task, but it is basic for all other operations. if you can control a LED with your program similarly you can control all other output devices like relay, motor etc.,
Arduino uno has a built in LED connected to pin no 13. This LED is very helpful when you are testing some output signals.
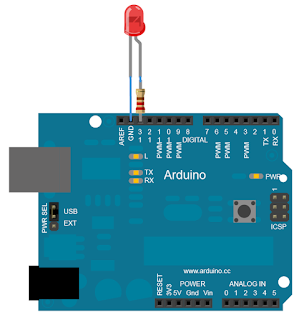
You can use the built in LED or connect an external LED like shown in the image on top. you can use any value of resistance from 220 ohms to 1K. here i am using 220 ohms.
Program:
void setup()
{
pinMode(13, OUTPUT); // initialize digital pin 13 as an output.
}
void loop() // the loop function runs over and over again forever
{
digitalWrite(13, HIGH); // turn the LED on
delay(1000); // wait for a second
digitalWrite(13, LOW); // turn the LED off
delay(1000); // wait for a second
}
The delay function is used to keep the LED in same state ON or OFF for a particular time period so we can see switching of the LED with Naked eyes. You can change the value 1000 in the delay function to adjust delay time.
The delay function is used to keep the LED in same state ON or OFF for a particular time period so we can see switching of the LED with Naked eyes. You can change the value 1000 in the delay function to adjust delay time.
Related Articles:


Post a Comment